Friday, November 25, 2016

Simplicity 1366 Review : Bell-sleeve Striped Shift Dress.


Last summer I made the Vogue 1445 below and wondered why I avoided shift dresses for so long. They're actually very flattering and look great on various body types, including mine. I vowed to made more of them in the future.


When J Crew launched their spring collection this year, I was immediately drawn to their bell-sleeve striped top and dress. The entire collection is quite amazing!


I set out to replicate the dress with the leftover black and white ponte knit I had from the Vogue dress. I'm happy to report that I was able to squeeze this dress out of a little over a yard of fabric. As a result, it's a bit shorter than I would have liked but it's definitely not a deal breaker! I have been wearing it a lot.


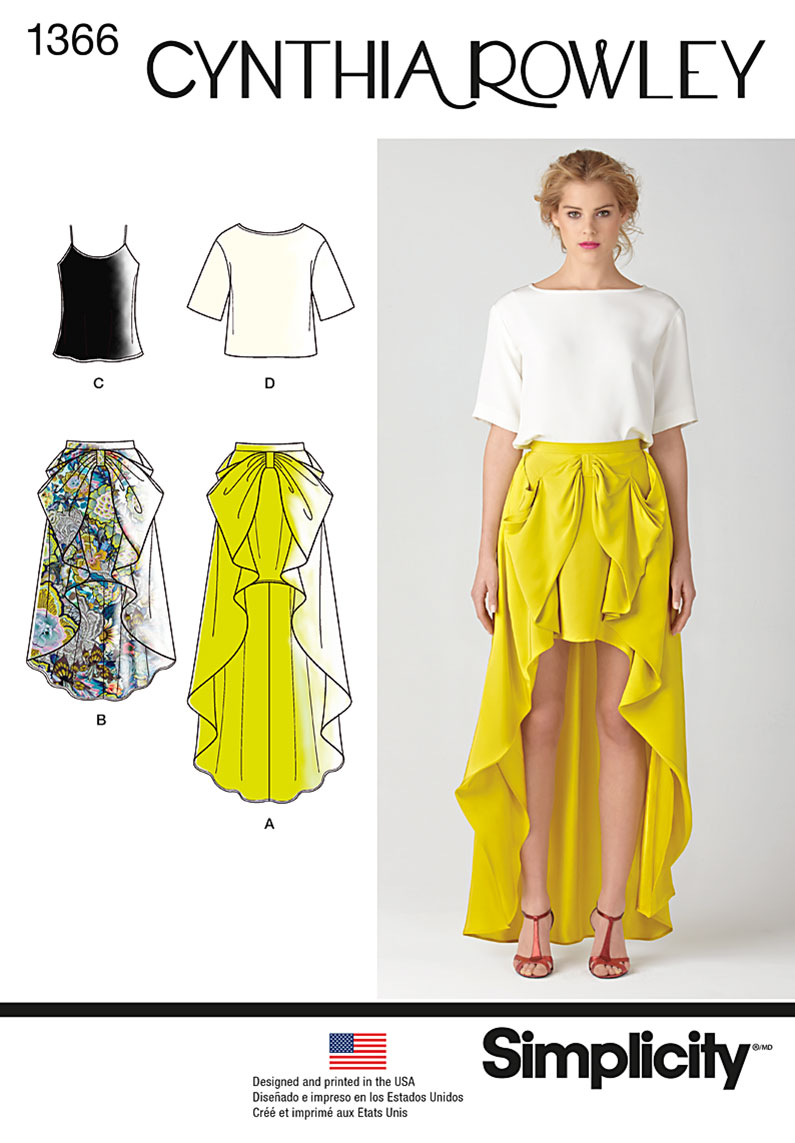
I decided to look through my enormous pattern stash and found the Simplicity 1366 pattern by Cynthia Rowley. With its dropped sleeves and boat neck, it's the closest match for the inspiration dress. All I needed to do was to add some length to the front and back bodice and shorten the sleeve to incorporate the ruffle.


Easy peasy! About half way through though, I decided to add pockets. Out came my trusty snip-a-stitch scissors to the rescue! I quickly undid the sides seams in order to incorporate the pockets. I'm really glad I did because it's one of my favorite features on this dress apart from the sleeves.


What a great pattern this Simplicity 1366 is. No wonder it's so popular in the blogosphere! It's simple, stylish and last but not least it can be hacked easily! I mentioned earlier that I was short on fabric. I used a black ponte knit for the pockets and to bind the neck. Everything is a bit shorter since I had just enough fabric to make the entire dress.

This summer and late into fall, I wore it with flats and wedges. Now that the weather has cooled down a bit around here, I've been wearing it with tall boots or booties. I thing the length is no longer an issue for me.


I can't wait to sew this up again. I have wide stripe cream and navy knit that would be perfect to knock off the J Crew top version. I'm also thinking of making the top in lace with the view C cami. 


 While my goal in sewing is not to save money but rather to have clothes that fit and are well made, I am quite pleased with this low-cost project. This dress is probably one of the most inexpensive I've made. The J Crew one quickly sold out at the price tag of $98. Mine is less than $20.

I have completed a few stripe projects that I will be blogging about soon, so stay tuned!

Friday, November 18, 2016

BurdaStyle 10/2016 - 102 Knotted Dress: I cracked the code!


Wait! 2 pattern reviews in the same week after a long blogging hiatus!!! 


I rarely make a pattern twice because there are way too many patterns on my to-do list. This burda dress proved me wrong. This is the first time I want to make several versions of the same pattern.


The October issue of BurdaStyle magazine had quite a few patterns that I really like and wanted to make.For instance, I was smitten by the long sleeve knotted dress and top when I received my copy. I was immediately intrigued by the construction because of the front knot. I set out to read the instructions and feared I might have to give up on it if they were too difficult to understand.


Burda has a long reputation for instructions that don't make any sense. Being a French speaker, I usually get the French issue of the magazine and I can attest that even the French instructions hardly make sense. This time however, I had a light bulb moment after spending some time reading them. Luckily, I remembered to snap a few pictures of the construction. Keep in mind that English is my second language, so bear with me as I try to explain how this worked. In this case, a picture is worth a thousand words! Lol


The top is attached to the skirt by the back seam only, the front is not. The back bodice is longer than the front bodice and that extra part is attached to the back skirt.  The picture below shows the back skirt pinned to the back bodice right sides together leaving the front skirt and bodice free.


The back skirt has to be stretched to match the width of the back bodice before stitching them together.


The next picture gives you a better idea of the rest of the construction. Once you secure the back side seam  by topstitching it down to the skirt side seams, you can fold the seam allowance wrong sides together, press and stitch it leaving an opening for the elastic. The rest is pretty straightforward after the elastic is in. I hope this helps! Feel free to ask questions if it's not clear enough!


To make things more complicated, I added pockets to both my versions. For the first one I used a heavy weight striped cotton spandex and for the second, a lightweight animal print ITY. They're both from my stash so this is a major stashbusting!


Now, the whole process didn't go as smoothly as I thought! You would think that a seasoned sewist like myself would not give into excitement and check measurements before cutting something and sewing! Anyway, I learned the hard way not to sew blindly again. I cut a size 42, which is my usual burda size, sewed the whole thing up in time for a party we were going to, only to realize how big and droopy it was!


Not the look I was expecting! I sadly had to wear another me made that night. So make sure you compare your measurements with the pattern's before you cut. I think Burda intended it to be loose and therefore put a lot of ease in the pattern. In the magazine, the top is quite loose on the model and the sleeves are pulled up on the dress so it's hard to guess. The final 2 versions are size 36.


After making the second version with the ITY knit, I noticed it wasn't as loose on me as the striped version, so I would probably size up to a 38/40 next time if I choose a lighter weight knit. I also reduced the sleeve length by 3 inches for a more fitted look.


I can't wait to make more versions. I'm thinking of a colorblocked one, a sleeveless one or just a plain 2 pieces version so I can mix and match the top and skirt easily. Oh the possibilities!!!!


These 2 dresses have been in heavy rotation in my wardrobe. And to think that I didn't like making a pattern twice. Oh well!!


Leaving you with another close up of the inside of the dress!
Until next time!


Tuesday, November 15, 2016

Back in business with the Panama Tee Dress: Pattern Testing Take 1 and 2


It's been ages since I last blogged about my sewing adventures. With all my good intentions, it's been nearly impossible to blog. Kudos to my fellow bloggers! It must be a full time job! I really lack the dedication and on top of that, I lack the time. Being a homeschool mom keeps me quite busy and my only free time is when my kids are at the homeschool co-op a couple of days a week. That's when I can sew, provided I don't have errands to run.


This little number is brought to you courtesy of Alina Sewing Design and Co. Alina is an indie pattern designer I discovered on Instagram. I bought her Chi-Town Chinos pattern this summer and never got around to sewing it. When she recently made a call for testing her upcoming Panama Tee and Dress pattern, I responded and was pleased to be selected. It's my first time testing a pattern! Yay me!!


The pattern is perfect for busy homeschooling moms like myself and calls for knits, which I've been sewing mostly because they're easy and quick to sew. Last but not least, I was happy to learn that Alina was homeschooled all the way through High school!
The Panama Tee and Dress pattern has 3 options. View A is a tee, view B is a knee-length dress and view C is a an ankle length maxi dress with a slightly flared hem. It also comes with a three sleeve length option:  short, half and long. I made the knee-length dress and the tee.


Take 1 is view B with half sleeve in a mystery knit I bought a while ago from the remnant table at Hancock Fabrics. Based on my measurements, I cut a 10 in the bust and hips and a 12 at the waist. With my fabric being a medium cotton spandex knit with a high stretch factor I had take about 1/2 inch from each sides. With heavier knit, I don't think I would need to remove anything from the width. I didn't make any major changes to the overall dress except for removing 1/2 inch from the sleeve cap. The bust as it is didn't bother me a highly stretchy knit but I am wondering if an FBA would be need with a heavier knit like ponte.


The fabric curled up like crazy which made sewing it challenging but is quite comfy to wear. I made a one and a half inch hem so the dress would be a little over my knees. I've worn the dress several time since finishing it and got many compliments. A long sleeve color blocked version is already cut and ready to sew.


My dress while not as loose as Alina intended it to be, is not fitted either. I kind of like it this way. Depending on the fabric you choose and your body type, this dress will not necessarily produce the same results.


Take 2 is view A, the Tee version is by far my favorite. Give me stripes and lace and I'm a happy camper I was inspired by a top I saw on shopbop.com. 
I used a striped rayon spandex knit and a black stretchy floral lace. If you follow me on Instagram you probably saw the early stages of the lace placement. It was fun but time consuming given the fact that the top itself is extremely quick to sew.


This time I chose the long sleeves and based on my measurements I cut an 8 in the bust and hips and a 10 at the waist. My knit was also stretchy so I had to take out an additional 1/2 inch from the sleeves starting at the elbow down to the wrist. I removed 3 inches from the long sleeve length and 2 inches from the bodice since I have a short torso.


The lace was topstitched down using a triple stretch stitch on my new and fancy Pfaff sewing machine. I love the back view of this top. I am really pleased with this pattern. I am planning on making a few more versions and can't wait to try the maxi dress.


To be honest, I didn't really follow the instructions since I've been sewing knits for as long as I can remember. I did however thoroughly read her instructions when I received the pattern and I can definitely attest they are very well written and contain a wealth of info and tips for beginners.


Thanks Alina for allowing me to test my first pattern! Be sure to check the Panama Tee and Dress pattern!