Monday, July 31, 2017

Pattern Review: Ribbons and Stripes Coco dress Hack


Are you ready for another Anthropologie knock off? It is no wonder that Anthropologie is so successful! They have positioned themselves as an avant-gardist of eclectic and original fashion. 


I draw a lot of my inspiration from their store and particularly love their selection of striped clothing. 
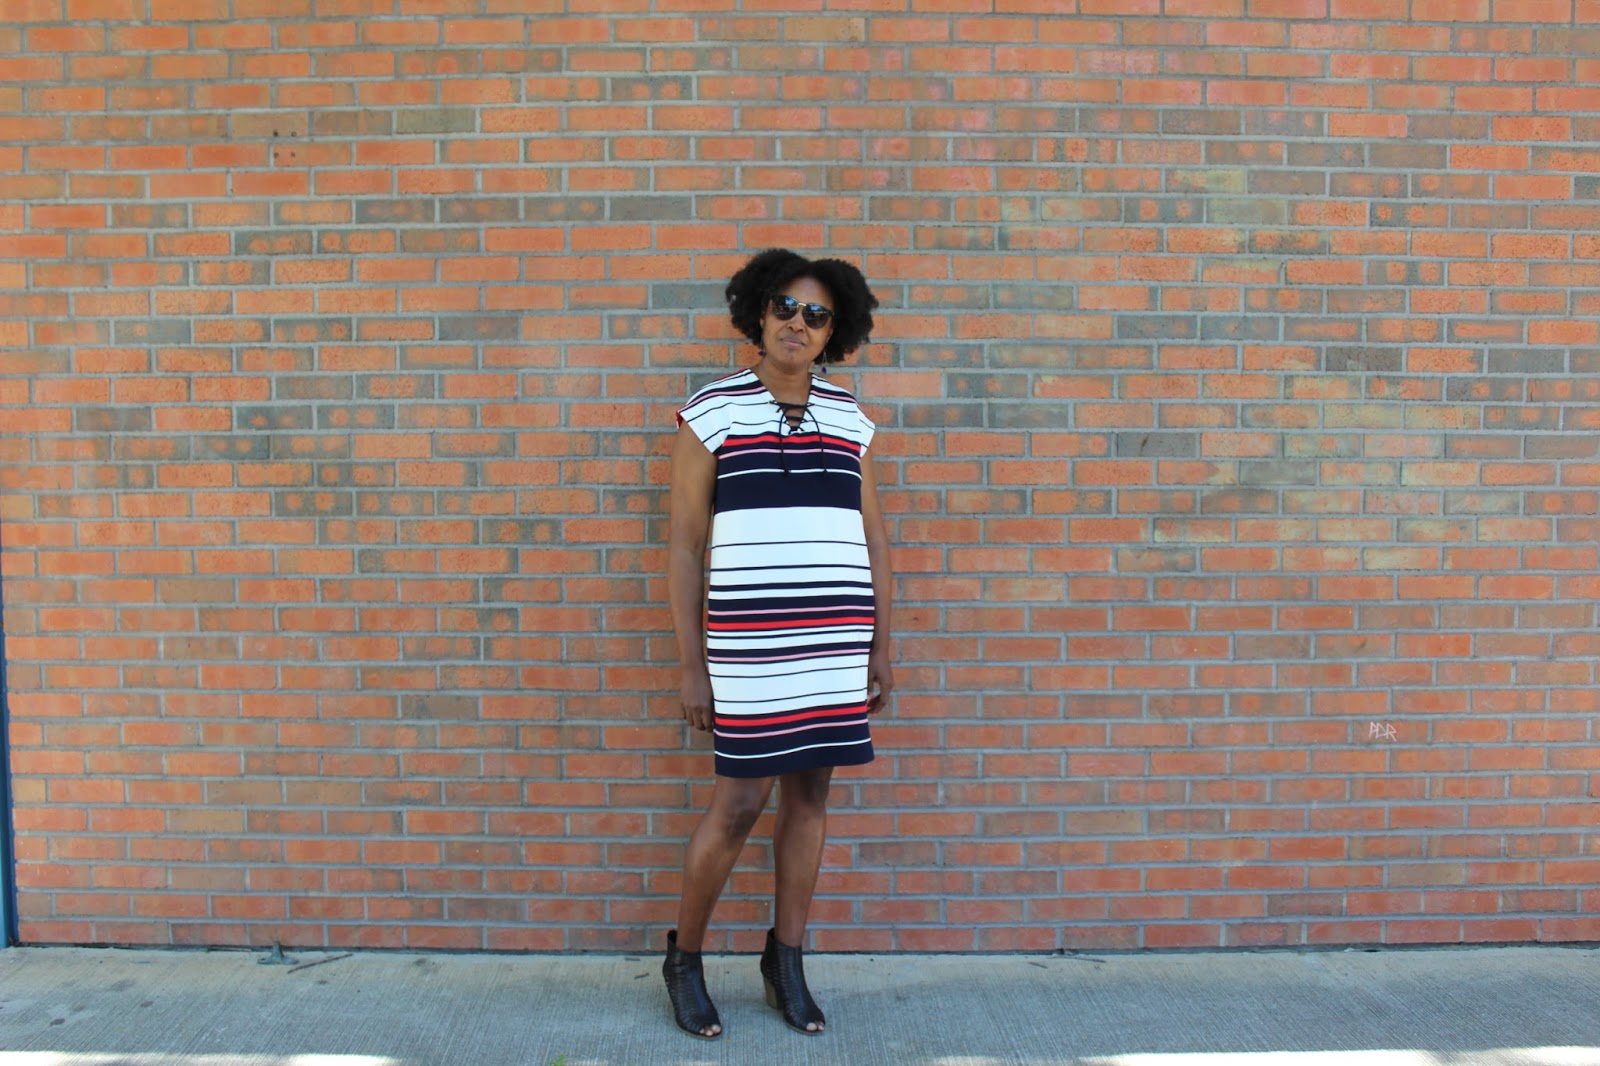
I discovered this beautiful striped dress by designer Maeve a few months ago! It was love at first sight!


This dress had two of my favorite features: stripes and grommets! I've been infatuated with grommets and eyelets lately.


I knew I could to make my own for a fraction of the Anthropologie version's cost ($168). I already had a black and white St-James ponte knit fabric in my stash and all I needed to purchase was some ribbon and large grommets, all of which cost me about $30 at Joann's.


As for the pattern, I used the popular Coco dress by Tilly and the Buttons. I've had that pattern for ages and probably am the last person on earth who hasn't sewn it. Well, it's never too late to jump on the bandwagon! Besides, it was the perfect choice for the Anthro dress with the A-line shape and the boat neckline.


The dress itself would take no more than a few hours to sew from start to finish but mine took a bit longer to complete because of the special design features I was adding. If you follow me on Instagram, you may have seen the construction steps in my stories. 


I haven't really been able to go to the store and check how they constructed the sleeves opening for the grommets placement but I was able to come up with my own idea of construction.


 Sleeve pattern cut in half lengthwise with 1.5-inch seam allowance. Determine the length of your placket.


Apply interfacing to the seam allowances and sew the middle seam up the top of the placket and trim. The interfacing stabilizes the grommets placket to avoid fabric distortion.


 Press the seam allowances open.


Fold the placket facing backward over a piece of ribbon the length of your placket and stitch. 


Trim and turn to the right side.


Pin ribbon to the right side of the placket. 


And carefully topstitch.


Make holes to set grommets in and proceed with the rest of the steps for the Coco dress. In retrospect, I should have hemmed the sleeves before setting the grommets in. It was a real pain to coverstitch once the grommets were in. Lesson learned!


Now, the sleeves are ready to be sewn in.


Another step I did differently from the pattern instructions was to draft a facing for the boat neckline and topstitch it down. I also drafted the back facing a bit longer than the front one just like the inspiration dress. I saw this method in the Japanese sewing book: She Wears the Pants, and decided to give it a try. I will definitely use it more in the future.


I noticed some pooling where the sleeves are attached to the bodice after the pictures were taken. I wonder why I didn't notice it when I tried it on after the dress was done. Blame it on the excitement for completing another knock off! I think I will need to take the armholes in a bit more to eliminate the pooling. Hopefully, that's an easy fix!


I really love this dress! It's an interesting take on sleeves. And it fits right into the Year of the Sleeve that's been celebrated on Instagram!
The Coco dress pattern is also a winner! I will definitely make it again!
  

Until next time! 


Friday, July 21, 2017

Pattern Hack: The Bowline Sweater Dress


This month is Indie Pattern Month over at The Monthly Stitch with its weekly sewing challenges. It's always been hard for me to maintain my own blog and even though I wanted to participate in their monthly challenges, I could never find the time to do so. Enter this week's challenge called Hack it. 


And you know how much I love to hack existing patterns! I decided not to pass this one up. And to kill a bird with two stones, I will also enter this dress into another challenge organized by a fellow French blogger styleetcie.canalblog.com.


As the title stated, I used the Bowline sweater pattern by Papercut Patterns and turned it into a sleeveless dress! When this pattern came out, I loved its originality and saw some cute versions on the blogosphere. 


Then last Christmas, I wanted to make a dress out of a gorgeous dark red animal print knit I've been hoarding for the longest. I started roaming through my PDF patterns and had a lightbulb moment. What if I took the sleeves out and added a skirt, it would make a cool dress with an equally cool neckline.


I read the instructions over and over again to understand the sort of burrito method they used for the shoulder drape. And since when it comes to knits, I can be quite fearless, I cut a medium size skipping a muslin, pinned it all together (ouch, I need to stop doing that!), tried it on and I was sold!


Since it was drafted to be a sweater, the armholes were really low but that was an easy fix.  I ended up not sewing the dress because I had promised my youngest one that I would make her a Christmas dress. 


Fast forward July, and the Indie Pattern Month challenge. I initially wanted to do yet another hack of the Lodo dress but figured I should take a break from that pattern after making 5 of them. Looking through my stash, I came across this cute tie-dye rayon knit fabric bought in May from Califabrics.


 I went through my PDF patterns again and decided to make the sleeveless Bowline. I dug out that UFO from Christmas and studied it carefully along with the instructions because I had completely forgotten how I put it together the first time.

 It wasn't too hard to figure it out. Below are pics (I apologize for the crappiness of the phone pics!) of the construction.


I proceeded as per instructions omitting only the sleeves


In order to sew the straps down, you have to hem or coverstitch the armholes beforehand. The next 2 steps are in the instructions but I'm adding the pics anyway. 


The pattern instructions are very well done! No surprises here.


Below is the burrito that makes the cool drape happen.


And voila! C'est fait! I did take a wedge out the side seams about 1 1/2 inches off at the armholes tapering to nothing at the waist. Otherwise, it would have been indecently low.


The skirt is pretty straightforward. I drafted 2 rectangles the same width as the bottom of the bodice and added pockets and an elastic at the waist. Threads magazine offered a inseam pockets template in one of their recent email newsletter, so I used that. 


Love, love, love this neckline. Topstitching knit straps is not for the faint of heart!


The back view.


There you have it. It took a day to sew this up. Okay maybe under pressure! But honestly, it's truly easy!


My photographer (aka my 13 years old) was reluctant to take these pictures. She's been begging me to do a blog post about the speech tournaments dresses and skirt I made for her. You'll be seeing those soon and many more. I've been very productive since summer started and was very diligent to get some sewing done before homeschool and speech season kicks off in August.

A bientot!


Sunday, May 21, 2017

Pattern Review : A Nautical Lace-up True Bias Lodo Dress


I'm back with yet another striped number. I hope you're not tired of seeing stripes on this blog!
This time, I went for a more colorful stripe fabric with nautical vibes. I took advantage of a 20% birthday discount at Style Maker Fabrics back in March and treated myself with this gorgeous Nautical Stripe Rib Texture Navy Ponte Knit (it's sadly sold out now).


 It's a mix of white, navy, red and pink heavyweight ponte with rib texture. I bought 2 yards of it without really knowing what I was going to make. Fast forward to the month of May with the rise of temperatures here in Nor Cal and finding myself reaching over and over again for my Inari dress (which I still need to write a blog post about) and the Simplicity 1366 ruffle sleeves dress!

Named Clothing Inari Dress (mmm17 pic)
Simplicity 1366 dress
I wanted to wear more shift and cocoon style dresses but rather than sewing another Inari and after seeing all the cute Lodo dresses popping up on Instagram, I opted for the latter. The fabric choice was inspired by a new French designer I discovered via a French Instagrammer. She had posted a top from a French magazine made in the exact same stripe fabric. How cool is that?


The designer Frnch Officiel Spring/Summer collection has some amazing stripe tops, sweaters and dresses. I was immediately drawn to the lace-up ones since I've been on a grommets quick recently.
While taping the Lodo dress from True Bias last week, it suddenly hit me that I could make it a lace-up by adding grommets to the V-neckline.


The pattern is quick to tape and cut. I added 2 inches to the length since it's drafted for a 5'5" woman and I'm 5'7". I cut a size 10 and graded to a 12 at the hip. It fits perfectly without any additional alterations.


The cocoon shape is really flattering and sure enough after cutting the fabric and basting it to check the fit, I was sold. 

 The stripes on the fabric were uneven so I almost thought I ruined it since it wasn't aligning properly with the pattern's grainline. I was relieved after basting it because it miraculously evened out with minimal stretching and stripe matching!


 Another interesting feature on the Lodo dress is that the facings are cut out of a woven fabric. I thought it was a clever idea and adds stability to the neckline and armholes and prevents the knit from stretching out. Because I was adding grommets, I interfaced the bottom part of the front neck facing for more stability.


After consulting my fellow sewists at a recent  Bay Area Sewists meetup, I went with gold grommets and a black cotton lace cord. In retrospect, a longer one would have been better. I'm planning on changing it to a longer length and add beads to the ends.


 Before sewing the side seams, I added the grommets. I wasn't sure how low the v-neck was and how many grommets to add on each side so I started with 2 and after trying it on a couple of times added 2 more. The construction is very easy as well. You really don't need a serger to complete this dress.


 I wore the dress twice already since completing it. I need to make another like yesterday!


Or maybe 2 or 3 
more!