Saturday, February 28, 2015

February Burda Challenge 2015: Michael Kors Dress Knock Off Burda 02/2008 #103 Twist Front Halter Dress Review


"Come on, baby, let's do the twist!" is what I was humming while getting ready to take pictures of this dress.
Twist is it indeed with this red little number! I really like Burda patterns! They are well drafted most of the time and this one is no exception. 
For my February Burda Challenge, I wanted to make something red and went through my magazines stash of February issues. I set my mind on the twist front dress from the February 2008 issue, also dubbed as the Tippi Hedren dress by some PR reviewers back then. I also went through my saved designer dress pictures to see if I could knock one off and found this Michael Kors Red twist front dress halter dress worn by Kate Beckinsale in 2012.


My only concern was figuring out how the twist was sewn and how to modify the top into a halter. I am so grateful for Tany for reviewing this dress and for the clear pictures and explanations she provided on her blog. I studied her pictures carefully and had this aha moment after a few minutes! As for the halter, I used Simplicity... pattern for the collar.


I had the perfect fabric in my stash. A yummy red matte jersey knit fabric I have been saving for years for the right dress. What I needed to find next, was a python leather print fabric or something similar at least. I looked online and in my local stores and found nothing. I was kind of apprehensive to sew a round collar in leather because it would need to be ironed and with leather it would have been impossible. After a few days, I remembered that I had some red python print suede ribbon in my stash. The only problem was that it was only 2 inches wide so it couldn't work for the whole collar, but if I cut it up and appliqued it on the collar, it might actually do the trick!


I printed off a giraffe print template online and used it to cut up the ribbon. Then, I appliqued them onto the collar using Steam a Seam light and topstitched them down.


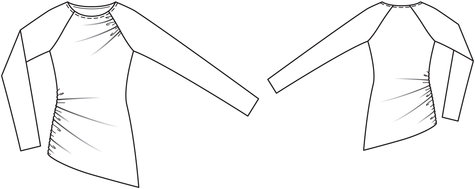
As for the dress, like I said, I used the Burda 02/2008 dress pattern 103.


I traced and cut up the size 42 and later had to take in half an inch on the sides. Great pattern but poor instructions! Nothing new with Burda! I omitted the sleeves and the cowl neck band obviously. I removed 2 inches from the top of the bodice and enlarged it using a slash and spread method so it would gather well.
I love how the twist was drafted. It actually makes your waist look slimmer!


Following the advice of a fellow PR reviewer, I connected both front skirt pieces thus making it a faux wrap to avoid exposure in windy situations. I copied the idea from an RTW wrap dress I own. I will be using that a lot in the future but the only downside is that it uses up fabric.
I didn't cut the back piece on the fold as suggested but added a center back seam and a waist seam. A waist seam to avoid any rippling effect and a center back seam because I wanted to add a zipper because of the collar. I wasn't too keen on adding an invisible zipper to the dress so imagine my joy when my friend/nutrition coach/fitness trainer Natasha who blogs at Fabulously Domestic asked me to fix a dress for her!!!


Isn't her dress gorgeous??? The back of her dress has a slit with buttons. It was just what I needed!!!


So, I lined the top with some red mesh I had in my stash. It makes for a neat inside of the dress.


All in all, the construction went pretty smooth except for the collar and for the loops which I had to undo several times because they kept on shifting. I reduce the size of the collar to make it 1 inch total in finished width. The two buttons are some red pearls I had in my jewelry stash for jewelry.


I also pegged the skirt by removing 4 inches all around at the bottom. I used my coverstitch for the hem. I think I added about 3 inches to the length of the skirt.
I wanted to wear this dress for Valentine's Day and was kind of bummed not to be able to finish the dress on time but at least it's finished. My February Challenge is completed and I have a spanking brand new cocktail dress for a future special event.


The asking price for the Michael Kors dress back in 2012 was a hefty 1795 dollars and it was sold out. I'm pretty sure my dress cost less than $30. I don't recall where exactly I bought the red matte jersey fabric but I don't think I paid more than $20 for it. I may have found it in a remnant bin. I used 2 yards of the fabric and have a bit more than a yard left.


So, Burda Challenge February 2015: checked. Stashbusting 2015: checked. Little red dress: checked. Happy face: checked. So, "come on baby, let's do the twist"!


Wednesday, February 11, 2015

Review McCalls 6886: The sequined LBD.


I don't know why I waited so long to use this pattern!! It has great reviews on PR but I didn't think of trying it until I had the Christmas party last December to go to. Not only did I procrastinate but I couldn't make up my mind on what to sew. So, I sewed both my metallic gold knit dress and this little number on the day of the party. Talk about sewing under stress!
I finished this black one first. I cut both dresses the night before and went to bed early knowing that it would be better for me to wake up early and refreshed to sew, rather than staying up late and taking the risk to make a mistake. I've learned my lesson from past debacles!


I started sewing this black dress around 7:00 and by 9:00, it was done and lined. When I tried it on and hubby gave me the thumbs up. My kids liked it too but thought it was a bit too dark which led me to get back to the sewing table in order to finish the gold wrap dress ignoring hubby who was rolling his eyes in desperation.
By 4:00, I had finished the gold dress. It definitely got the preference over the black one from everyone at home and a few friends I had texted the pictures to.


Back to the black dress. It was such an easy dress to sew up. 3 pattern pieces if you choose the sleeve version. I did break a few needles in the process because of the tiny sequins but all in all it was a quick sew with the serger.


The pattern is the McCalls 6886. I made the view B with the scoop neck from the view C. I cut the size 12 and had to take it in a little.


The fabric, a sequined wave cotton knit came from my stash. I think I got it on Etsy about a year ago. The sequins are sewn on with nylon thread on top and cotton thread underneath but to avoid any sort of scratchiness, lined it using a black lining knit fabric also from my stash. I only lined the front and back and not the sleeves. So far, the sleeves are not scratchy.


Originally, I made it in a maxi length but last week I decided to shorten it. I figured it would be much easier to wear it more often if it's shorter then longer.
I chose not to hem it. I could have but I thought it would be interesting since it's a knit and won't ravel to just trim it along the wavy sequin pattern. I hemmed the lining with my coverstitch.
I really like this dress and will be making more in the future.


.

Monday, February 9, 2015

McCalls 6713 Review: DVF inspired dress for American Hustle themed Christmas party


Finally getting around to blog about one of my favorite makes of the year 2014. The DVF inspired metallic gold wrap dress.
2014 was the year of the Diane von Furstenberg and the 40th anniversary of her iconic wrap dress. I love wrap dresses. There's something so feminine about them. I own a few RTW wrap dresses and have made a few myself but I'm still on a quest for the perfect wrap dress. I have given up on bidding on the coveted Vogue 1549 on eBay so instead I try to combine different wrap dress patterns in order to achieve the right fit.
In December, hubby announced that his Christmas party's theme was American Hustle. Immediately I thought of a wrap dress since Amy Adams wore them in the movie. But as usual, the procrastinator in me waited until the last minute to get sewing. I finished the dress a few hours before heading out to the party.
My inspiration was the DVF Nina Metallic wrap dress which I became obsessed with when I saw it on her website. The dress cost $1398!!! Yikes! I think I can make this for less!


I didn't have to buy any new fabric since I had some metallic knits in my stash. I bought those during the PR weekend San Francisco in 2012. I wish I had bought more of those because I didn't have enough fabric to make a real wrap dress and make the dress long enough.
After going through all my wrap dress patterns, I settled on the McCalls 6713 which was the closest to the inspiration dress with the gathered shoulders and bodice.


 I chose the view C and cut a size 10. I modified the front wrap curve by raising the curve of the neckline. It's less curvy that way but reduces the risk of gaping. Once the bodice was cut, I removed the built-in cap sleeves using my sleeve curve ruler. I liked the fact that the bodice is lined and the instructions are well written on how to line it. The construction went rather quickly including lining the dress.


Interestingly, I noticed that the lining on the DVF dress was white. I thought it was awkward at first but after trying a few different color lining fabrics underneath the gold, I realized the white did a better job at bringing out the gold color. Luckily, the white knit lining fabric was in my stash as well.


I used stay tape to stabilize the neckline and the shoulders. That in addition to raising the neckline curve resulted in a crossover that was snug with no gaping.


Because I was short on the metallic fabric, I couldn't make a real wrap which was fine because I didn't have to worry about any flashing. I couldn't cut a full waistband either so I took the waistband from an old metallic gold top. I don't wear it anymore but I kept it just in case. It's a slightly lighter gold but hardly noticeable and it worked perfectly.


Anyway, the American Hustle party was at the Levi's Stadium. It was a lot of fun. I even had compliments on my dress.


Great food, great music!


I wish the dress could have been longer. I am 5'7" with long legs and a short torso so with high heels, the dress is a tad short. I am contemplating shortening the dress for good in order to wear it more often or finding the same gold mesh knit and redoing the skirt part. We shall see.


Saturday, February 7, 2015

January Burda Challenge 2015: Striped Dress using the Burda 01/2014 Asymmetrical Top Pattern


Mieux vaut tard que jamais! Better late than never!
I have neglected this blog because sewing has taken the back seat since homeschool has started. I did manage to whip up 2 dresses in December for a Christmas party. I will try to blog about them and my sewing goals for 2015 hopefully before the end of this month.
I finally manage to finish my January Burda Challenge which was also suppose to be my entry in the January PR's Bargainista Fashionista contest. I wasn't able to finish on time for the contest. I couldn't decide what to make and when I figured it out, time simply ran out.
I was so excited when I saw the call to participate in the 2015 Burda Challenge on PR and Twoontwooff's blog. My Burda magazine collection goes back to 2003 I think. When I used to live in France, I had every single issue from 1989 to 1999. I donated them to friends before moving to the US and only kept a few for myself. Sadly, I have very little to show from my huge stash. It's about time I change that!
I'm glad the rules aren't restricted to the 2015 only magazines. I can opt to stick with the month but use whatever year I want. Since I wanted to do a knock off and there wasn't a lot in January issue that I really wanted to sew, I picked the January 2014 issue. I loved that issue when it came out because of the asymmetrical striped top on the cover. I can't get enough of stripes!

My inspiration for the knock off is a dress from ICB I saw on the Gilt website last year. The original dress was $395. I immediately thought of the Burda top pattern when I saw it and waited to find the right fabric to sew it until this month.


After brainstroming on how to replicate the dress, I drew a few sketches based on the line drawings. I'm in serious need of a sketch notebook!


I had several black and white striped fabrics in my stash to choose from. The ICB seemed to have been made out of a lightweight rayon knit fabric since you can see the model's legs through the dress. Using a rayon knit which I had, meant lining the dress and given the short time I had, that was not an option. So, I went with the ponte striped knit instead. My only concern was that with a ponte knit the gathering wouldn't be as dramatic as it would with a rayon knit. But then again I didn't have to line it, so the ponte it would be. The contrast fabric is a black ponte also from my stash.


The changes I made are:
-adding a 1 inch contrast band to the raglan sleeves,
-drafting a gathered side to the back bodice by using a slash and spread method(I had to cut the back bodice twice because I was tired and cut it backwards),


-shortening the sleeves,
-adding an asymmetrical lower band with a contrast to lengthen the top into a dress,
-adding ruching to the sides of the lower band.


Because of the modifications, I constructed it a little differently than the Burda instructions(which I find easier to read in French than in English). After trying it on, I reduced the length of the elastic band and increased the gathering an inch more than directed. I also gathered the sides together instead of separately as instructed even if it was a little harder to gather 2 pieces of fabric rather than one. I omitted the bias interfacing which I don't think was needed since my fabric was a medium to heavy weight knit.
I don't like the instructed way of finishing the neckline. With a lighter knit, it might be an okay method but with a ponte, it adds bulk to the neckline. I'm thinking about removing the band and serging either clear elastic or regular elastic to the wrong side, turning it under and topstitching it to finish the neckline. I've done it before on a raglan sleeve dress and like the result better.


I like this dress a lot though I think it won't be worn much because it is not a very casual dress. So much for my sewing goal for 2015 which is to make more casual, easy to wear, everyday stuff instead of one of a kind garments that linger in my closet waiting for the right occasion or event.
For my February challenge, I'm afraid it's going to be dressy again but to my defense it's my Valentine's Day dress. Stay tuned!