As I transition into a new stage of my sewing journey, I had decided to move all my content and future posts to a new page: sewuthinkucan.com
Saturday, October 17, 2020
Saturday, July 18, 2020
Pattern Review: Megan Nielsen Opal Top and Olive Shorts

I'm back at it again after almost a year hiatus. I will try to regularly blog about my makes. My sewing mojo was pretty much MIA since my last post. After spending the whole summer abroad, we sent our oldest off to college with a heavy heart. Sewing has taken the back seat while we were trying to adjust to our new normal and spending quality time with our girls.
Fast forward to Covid-19 and quarantine when the sewjo decided to pay me another visit. Only this time, it came with an opportunity for me to use my sewing skills to help volunteer sewists make hospital gowns for healthcare professionals for a non profit my neighbor started. I recorded several how-to youTube videos to help the 200+ volunteer sewists who joined our collective.
The sewjo decided to linger for a bit and Me Made May gave me some incentive to add some cool stuff to my wardrobe. One of my pledges for MMM was to make more separates and less dresses. I'm happy to report that I made 9 tops, 5 shorts, 1 skirt, 2 dresses and repurposed 3 things. I think the only time I've been this productive was when I used to batch cut and sew. I might need to try it again.
Now let's talk about the new patterns that Megan Nielsen released this month. I was thrilled when she asked me for an honest review and even allowed me to put my own spin on them. The first one is the Olive dress and top pattern with a lovely v-insert. I love the dress or top option, the drop shoulder and multiple sleeve finishes this pattern offers.

The fabric options for the pattern are endless. Anything light or medium weight will work but I think heavier more fall appropriate fabrics can also be used for transitional looks. Think corduroy, flannel, lightweight wool, or even heavier knits. This summery gingham is a light weight linen and I cut a size 12 although I could have gotten away with a 10.

My hacked blouse version is paired with the Opal shorts which is the second pattern that was also released.
I've been on a gingham kick lately so a quick run through my stash turned up 2 thrifted embroidered gingham dresses that I decided to repurpose into the Olive blouse.

The eyelet embroidered border was begging to be the center of attraction and pretty much dictated this hack. That v-neck insert needed to be adorned with ruffles.

Both dresses were chopped up and though the pattern calls for the front and back bodices to be cut on the fold, I had to do some piecing together to have enough to cut them. Tons of pins were used in the process to get the stripes on this very shifty linen to match.

With even more pins, patience, determination and a little bit of screaming, I also got the v-neck insert to line up perfectly.

Next was making bias binding out of the leftover scraps. I don't why but I find it oddly satisfying to make bias tape. The bias binding instructions are well done and the result is very pretty. Check the #mnolive hashtag to see how some testers used the bias binding as a fun contrast on the right side of their blouse.

In my eagerness to account for every single scrap of fabric of these two dresses, I ended up with plenty of bias tape leftover for upcoming projects.

I even used it to face the hem.

During this whole repurposing process, I kept on thinking that any mistake will mean having to start all over again with a different fabric so I'm happy this top came out as I envisioned it. Along the way I experienced with different layouts of the ruffle before finalizing and stitching it in place.

The resulted eyelet trim I got from both dresses provided enough length for the ruffle to go from front to back.

I debated adding sleeves and would probably have gone sleeveless but ultimately the zero waste approach won so I used the original neck flounces to eek out the puffed sleeves.

Puffed sleeves or flounced sleeves? I tried both and gathered sleeves and ruffles give a more cohesive look altogether than the opposite. I used the widest part of the flounce for the sleeve top, added a ruffle at the bottom and inserted elastic through a white bias tape casing.


For the Opal shorts I chose the paperbag waist version and used a smaller scale blue gingham fabric from my stash. I cut a size 12.

You can get the most bang for buck with the many variations the Opal pattern offers. The shorts version sewed up really fast. It only took me a couple hours from start to finish to complete them not including taping the pattern. I did leave out the belt and the belt loops which made it even faster to make.


For someone who owns almost all of Megan Nielsen's patterns I've only made a few of them to date. The most recent one is my hacked Dove dress which I can't wait to make again and again. It made me realize what I've been missing. Her patterns are well drafted and the instructions are really great.

The verdict: These are two well drafted and easy to make patterns. I love how comfy the blouse and the shorts are. I love my full-on gingham outfit and am already thinking of another hack version of the Olive top and the pants version of the Opal. You can find more inspiration and ideas in a recent blog post on the MN website and most importantly the endless combinations will help you sew up a whole new wardrobe.

Until next time.
Wednesday, September 25, 2019
Jumping into Fall Trends: Style Maker Fabrics Tour

Happy fall!
I'm back on this blog. It's been quite a while since I last posted my makes. Almost 2 years to be exact. I blame Instagram for it. Although I find IG more convenient, I keep regretting not documenting my me-mades especially my hacks.
When Michelle invited me to be a part of Style Maker Fabrics Fall Blog Tour, I saw it as an incentive to revive this blog and jumpstart my sewing mojo which has been dormant this summer because of my 2 months long trip to Europe and Africa.

Style Makers Fall fabrics fall 2019 selection is fabulous. I had the hardest time making up my mind on what to pick and Michelle was gracious enough to send me pics of various fabric pairings to help me in my decision process.
Make sure you check out Lindsey's (Inside the Hem) swatch review video. You get an insider look at the fabrics, she shows you how to pair them and what pattern will work for these fabrics. Love it!

Here in NorCal, our fall and winters are extremely mild, and right now it doesn't seem like the temperatures will drop anytime soon. In the meantime, I've been already thinking about sewing a fall wardrobe and incorporating some of the 2019 fall trend key elements to it.

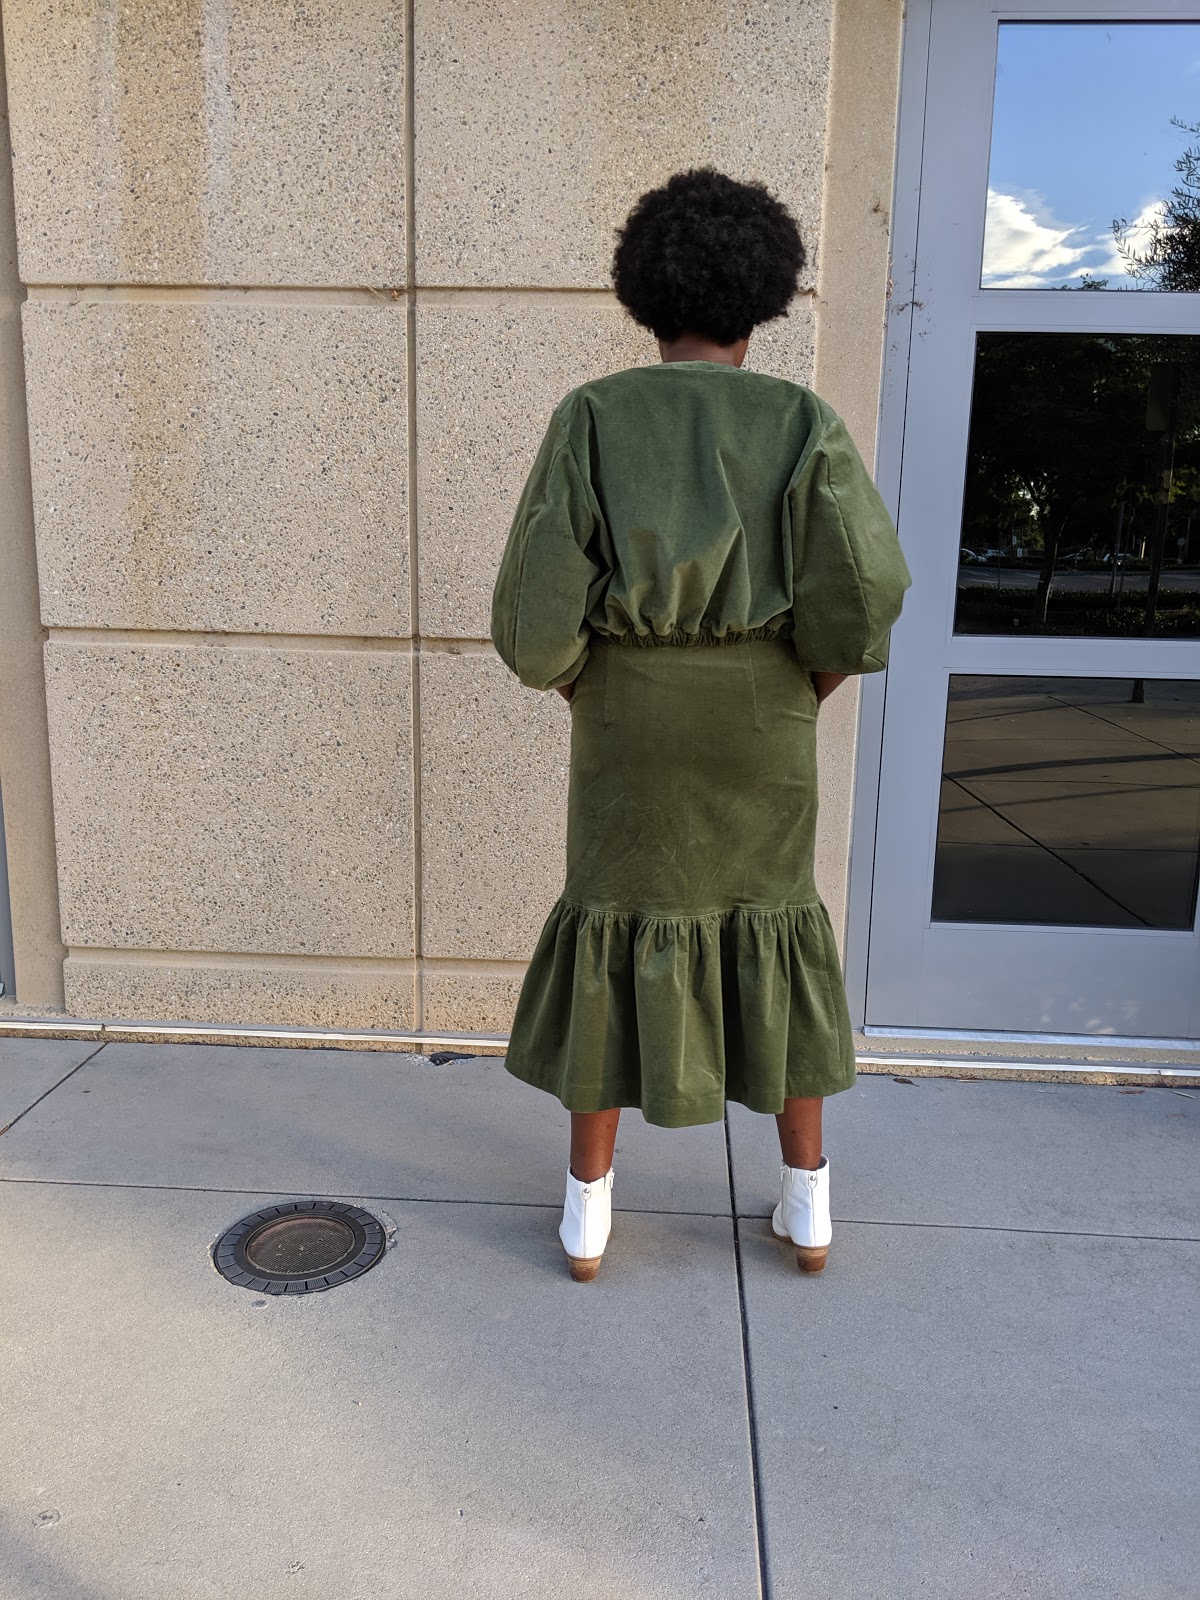
Corduroy and plaid which are making a big comeback this fall and I couldn't be happier. I chose a stretch pinwale corduroy solid olive and a giant gingham check flannel shirting navy white. At first, I wanted to make a jumpsuit but then stumble upon this Anthropologie skirt and gingham top and knew they'd be really cool together.
I love the result!

Now for the pattern deets.

For the skirt, I simply hacked the Closet Case Fiona dress.
I used the midi skirt portion, cut it in half and extended the bottom half to make a ruffle. The ruffle ratio is 1.5:1 for the two front pieces and 2:1 for the back. For the waistband, I used the pattern piece for the Jenny Overalls also from Closet Case.


My only complaint is that it's nearly impossible to make buttonholes on corduroy fabric. If you have any tips on sewing buttonholes on corduroy, please do share.

For the top, I hacked the Grainline Studio Scout Tee pattern. I raised the neckline by about 1 inch, reduced the bodice front and back length by 1 inch, changed the back neckline to a V-neck. Last but not least, I redrafted the original sleeve pattern to get a puffed sleeve, because puff sleeves are here to stay and I can't enough of them. I used a 1 inch wide elastic to gather up the sleeves hem.
The gingham flannel is a dream to work with and sew. I have a little bit of fabric leftover and so I think I can squeeze a cropped shirt or an Ogden Cami out of it.
Can you tell I had a lot of fun playing with the Scout Tee sleeve?


 Next and totally unplanned is the Burdastyle Puffed Sleeve bomber jacket. Because my original plan was a jumpsuit, I got 3 yards of the stretch corduroy. The skirt used up about half of the total yardage and thus the bomber idea came about. And I'm in love with it.
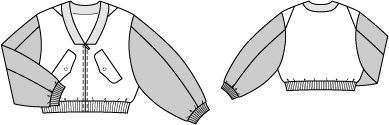
The sleeves are the same as the Burdastyle top sleeves I added to my winterized True Bias Lodo dress below.

1.5 yards wasn't enough to properly cut every required pattern pieces so I used up every single scrap of the fabric to the point where I forgot that corduroy had a nap and placed my pattern pieces in different directions. Fortunately, it's not too obvious but I definitely learned my lesson. Corduroy is a napped fabric so it looks different and reflects the light differently. You'll need extra yardage in order to follow the nap layout. Make sure all your pattern pieces lay in the same direction.
A nifty little thing I used to avoid crushing the nap or pile of the corduroy is the Velvaboard. You can find it for a reasonable price on Ebay. There's also something called needle board but it's way pricier than the Velvaboard.


As far as closures, I opted for sew-on snaps rather than a zipper since I wasn't able to find a matching zipper anyway.

On the above picture, you can tell there's a difference in color. Oh well! We live to learn!


Thank you Michelle for these awesome fabrics and letting me be a part of the Style Maker Fabrics 2019 blog tour. It was a fun ride! The stretch corduroy fabric comes in 2 other colors and I'm definitely going to get the rust color to make that jumpsuit.

The sweet and talented Tori The Doing Things Blog is up tomorrow for Day 4 of the tour. I'm excited to see what she made.

Until very soon!
Monday, July 31, 2017
Pattern Review: Ribbons and Stripes Coco dress Hack

Are you ready for another Anthropologie knock off? It is no wonder that Anthropologie is so successful! They have positioned themselves as an avant-gardist of eclectic and original fashion.

I draw a lot of my inspiration from their store and particularly love their selection of striped clothing.
I discovered this beautiful striped dress by designer Maeve a few months ago! It was love at first sight!

This dress had two of my favorite features: stripes and grommets! I've been infatuated with grommets and eyelets lately.


I knew I could to make my own for a fraction of the Anthropologie version's cost ($168). I already had a black and white St-James ponte knit fabric in my stash and all I needed to purchase was some ribbon and large grommets, all of which cost me about $30 at Joann's.

As for the pattern, I used the popular Coco dress by Tilly and the Buttons. I've had that pattern for ages and probably am the last person on earth who hasn't sewn it. Well, it's never too late to jump on the bandwagon! Besides, it was the perfect choice for the Anthro dress with the A-line shape and the boat neckline.

The dress itself would take no more than a few hours to sew from start to finish but mine took a bit longer to complete because of the special design features I was adding. If you follow me on Instagram, you may have seen the construction steps in my stories.

I haven't really been able to go to the store and check how they constructed the sleeves opening for the grommets placement but I was able to come up with my own idea of construction.

Sleeve pattern cut in half lengthwise with 1.5-inch seam allowance. Determine the length of your placket.

Apply interfacing to the seam allowances and sew the middle seam up the top of the placket and trim. The interfacing stabilizes the grommets placket to avoid fabric distortion.

Press the seam allowances open.

Fold the placket facing backward over a piece of ribbon the length of your placket and stitch.

Trim and turn to the right side.

Pin ribbon to the right side of the placket.

And carefully topstitch.

Make holes to set grommets in and proceed with the rest of the steps for the Coco dress. In retrospect, I should have hemmed the sleeves before setting the grommets in. It was a real pain to coverstitch once the grommets were in. Lesson learned!

Now, the sleeves are ready to be sewn in.

Another step I did differently from the pattern instructions was to draft a facing for the boat neckline and topstitch it down. I also drafted the back facing a bit longer than the front one just like the inspiration dress. I saw this method in the Japanese sewing book: She Wears the Pants, and decided to give it a try. I will definitely use it more in the future.

I noticed some pooling where the sleeves are attached to the bodice after the pictures were taken. I wonder why I didn't notice it when I tried it on after the dress was done. Blame it on the excitement for completing another knock off! I think I will need to take the armholes in a bit more to eliminate the pooling. Hopefully, that's an easy fix!

I really love this dress! It's an interesting take on sleeves. And it fits right into the Year of the Sleeve that's been celebrated on Instagram!
The Coco dress pattern is also a winner! I will definitely make it again!

Until next time!
Subscribe to:
Posts (Atom)